
How to set up and configure a DCA / signal bot
A signal bot (also called a DCA bot) opens and manages positions when a signal arrives. It never starts on its own: something has to tell it to trade, whether that’s one of Altrady’s signal providers or an alert you send in yourself. Creating one is a three-step wizard, and you can either start from a template or configure every parameter by hand.
Before you start: you need a connected exchange account, or a demo account, linked to Altrady. See Connecting your exchange for your exchange’s own setup guide.
Open the bot wizard
- Open Bots in the left-side menu.
- Click + Create at the top right of the Trading Bots page.
- Choose Signal bot in the Create a bot dialog.
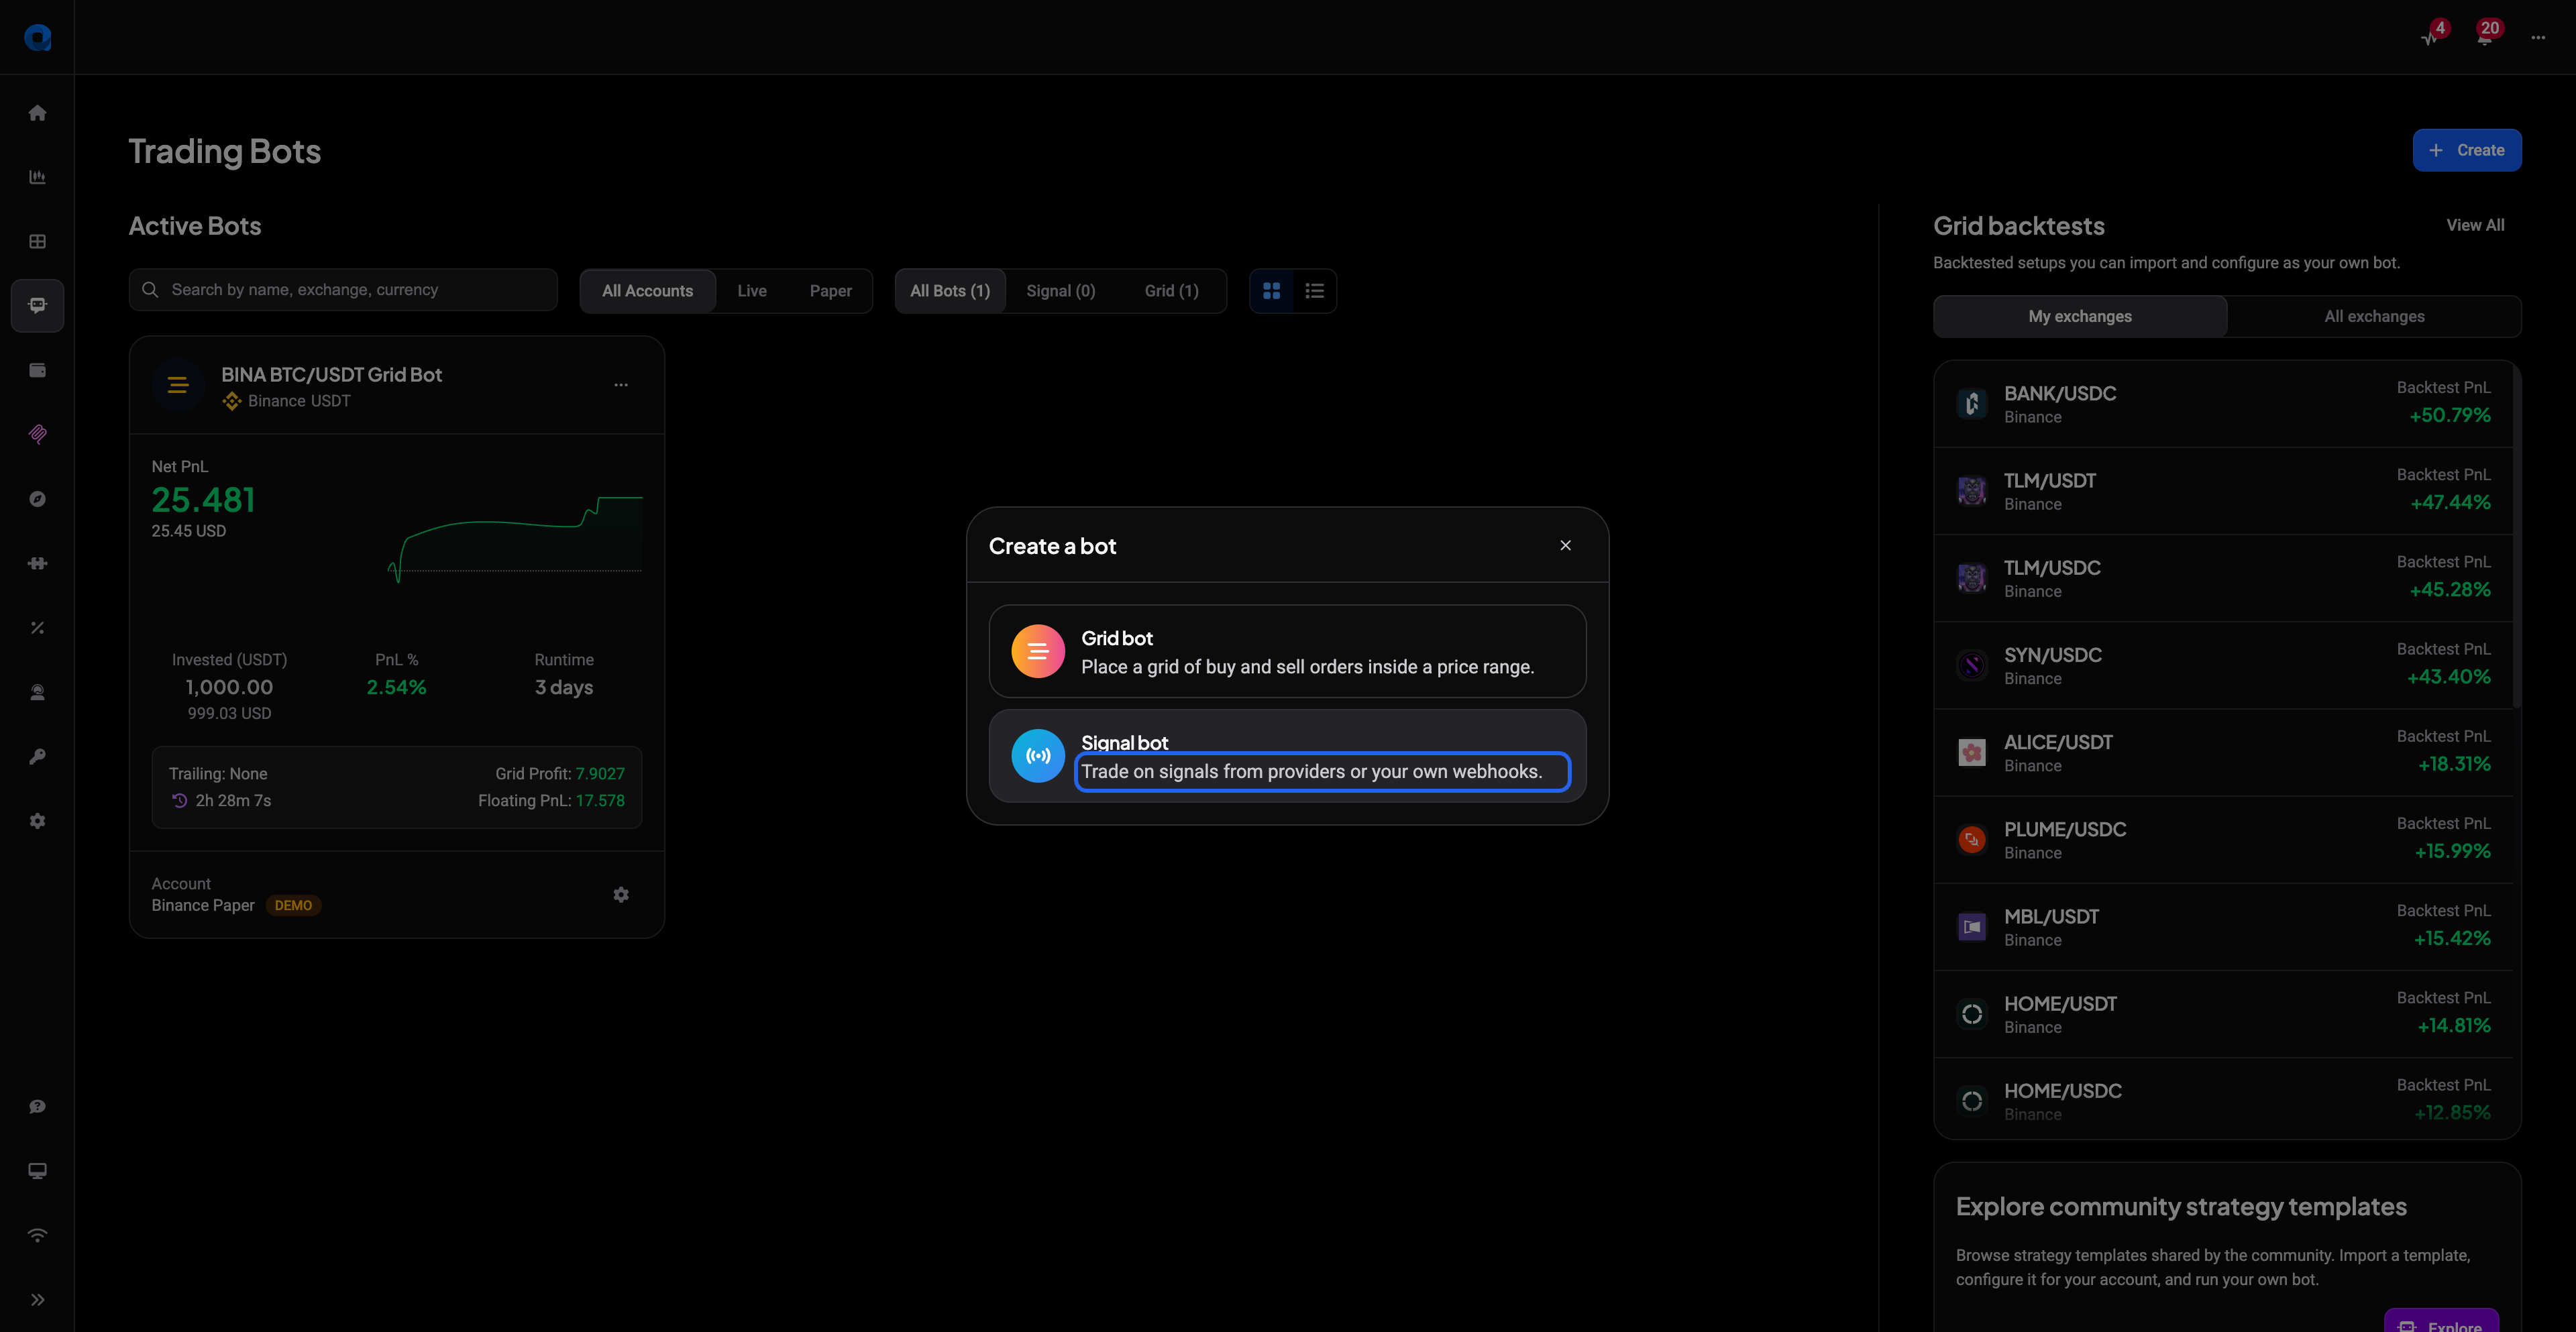 🔍 Click the image to see a larger version
The trading terminal’s Tools widget also lists Signal Bot, which opens this same flow on the Bots page.
Step 1: Choose your signal source
The wizard opens on Choose your signal source, with four options in two groups.
Signal providers are ready-made feeds:
- Crypto Base Scanner: Altrady’s own scanner, which watches markets using configurable algorithms and sends entry signals.
- The Better Traders: a curated signal service integrated with Altrady.
Custom signals are feeds you supply:
- TradingView alert: fires the bot from a TradingView alert via webhook.
- Custom webhook: accepts JSON signals from your own bot or a third-party service.
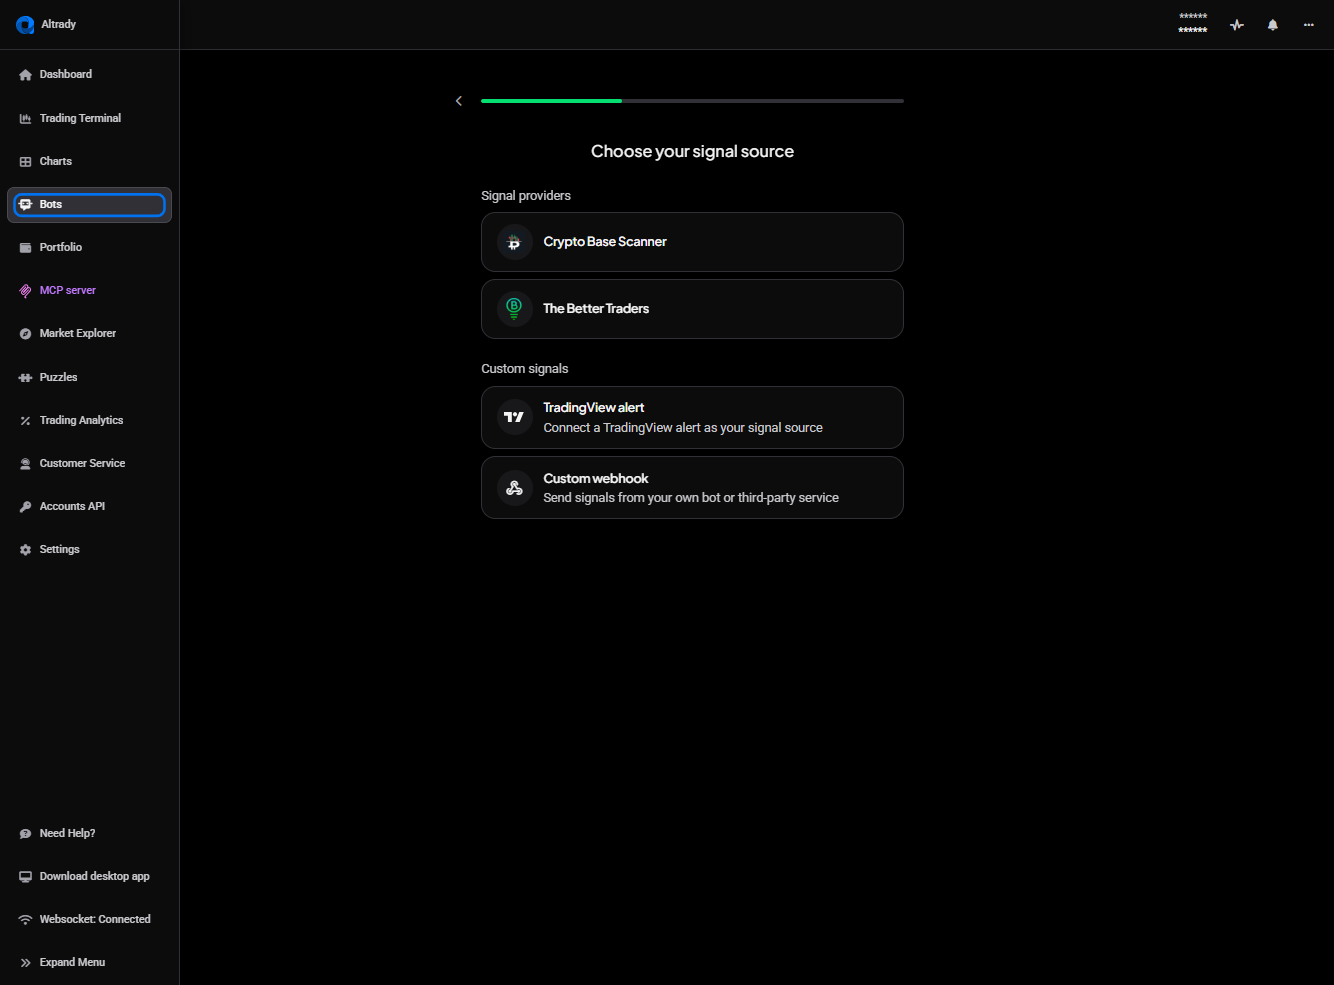 🔍 Click the image to see a larger version
Selecting one moves you straight to the next step. Your choice matters later: some Filters options only apply to Crypto Base Scanner signals, and the two webhook sources need a finishing step once the bot exists.
Step 2: Trading account and investment
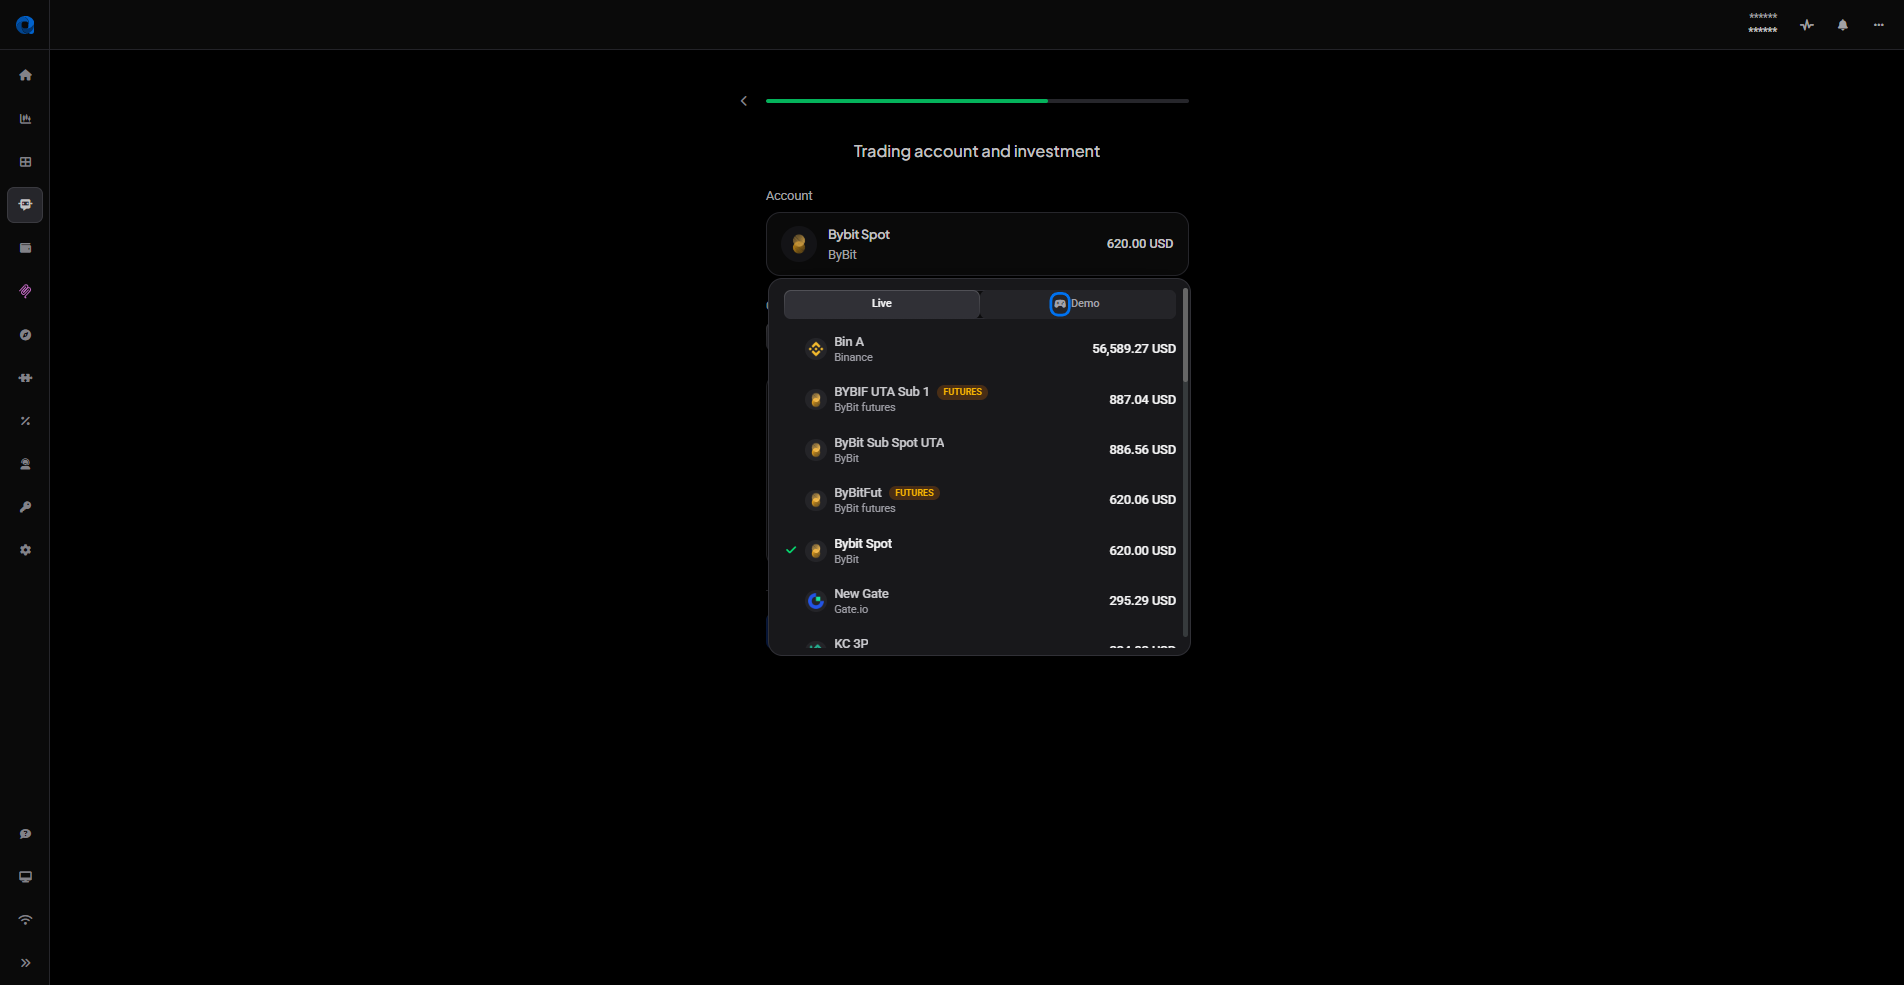
Next comes Trading account and investment.
- Account: pick from your connected accounts. The picker separates Live and Demo, and each row shows the account name, its exchange and its balance. This choice decides whether you finish with a live or a demo bot, so check which tab you’re on.
- Currency: USDT, USDC, or another currency the account holds.
- Investment: the total capital this bot may hold across all its positions at once. Quick-select buttons offer amounts based on your available balance, or you can type your own.
- Reinvest profits: when enabled, profit from closed positions is added back into the investment pool instead of being paid straight out.
 🔍 Click the image to see a larger version
One thing worth checking before you fund a bot: the money needs to be in the right wallet on the exchange already. Altrady can’t move balances between spot and futures wallets for you.
Click Next when you’re done.
Step 3: Parameters
The last step is headed Parameters and offers three ways to start: Template 1, Template 2, and Start blank.
The two templates are ready-made configurations. They differ in how many positions the bot may hold at once, how many DCA entries it stacks below the first one and how far apart those sit, how far out the take-profit target is placed, where the stop loss goes and what protection it uses, and how the investment splits between the entry order and the DCA orders. Template 1 allows fewer positions with fewer DCA entries and a closer stop; Template 2 allows more of both. The values also differ depending on whether you picked a signal provider or a custom signal source.
Pick either one and a summary card appears beneath, laying out exactly what that template will do: signal source, max positions, DCA entries and their deviation, take profit, stop loss and its protection mode, any filters, and the resulting position size with an entry-versus-DCA split bar.
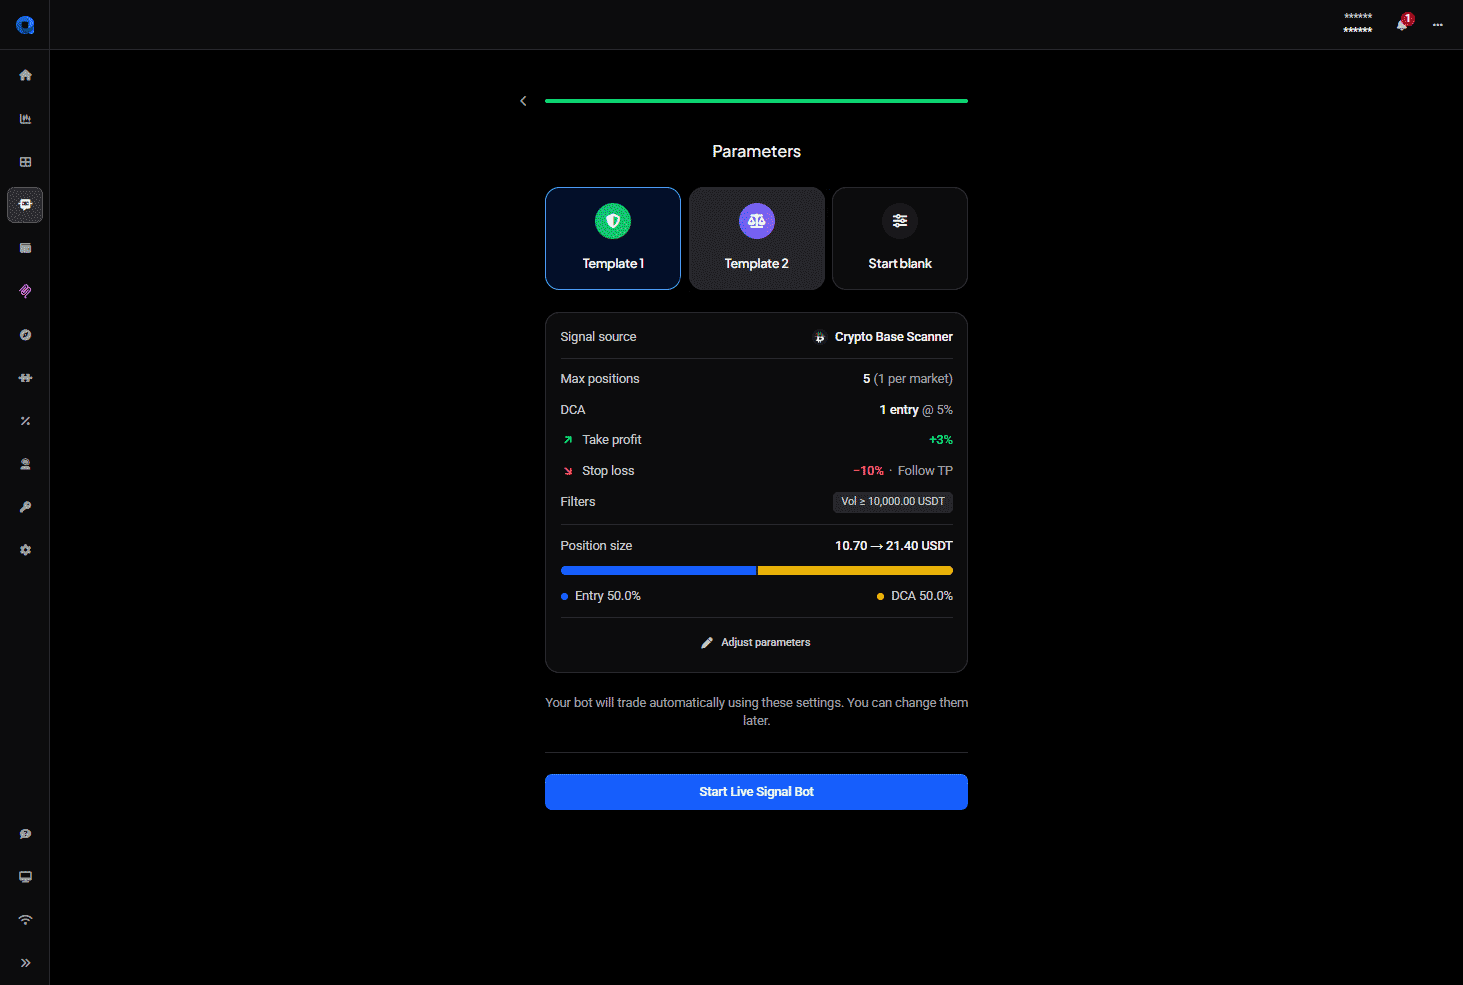 🔍 Click the image to see a larger version
From here you have two routes. Start Live Signal Bot launches the bot on the template as it stands. Adjust parameters opens the full Parameters tabs so you can change anything first. Start blank goes straight to those tabs with nothing preset.
Nothing you choose here is permanent. As the screen itself says, you can change the settings later.
The Parameters tabs
This is where you shape how the bot builds and closes a position. There are four tabs: Entry, Take profit, Stop loss and Filters. A tick appears on each one as you complete it, Next moves you to the following tab, and Reset returns the current tab to its starting values. On the last tab the button reads Review instead. The Preset dropdown at the top right lets you drop a template’s values in at any point.
The tabs interact, so it’s worth reviewing all four together rather than one at a time. A deeper DCA ladder needs a stop loss with enough room below it, for instance.
Entry tab
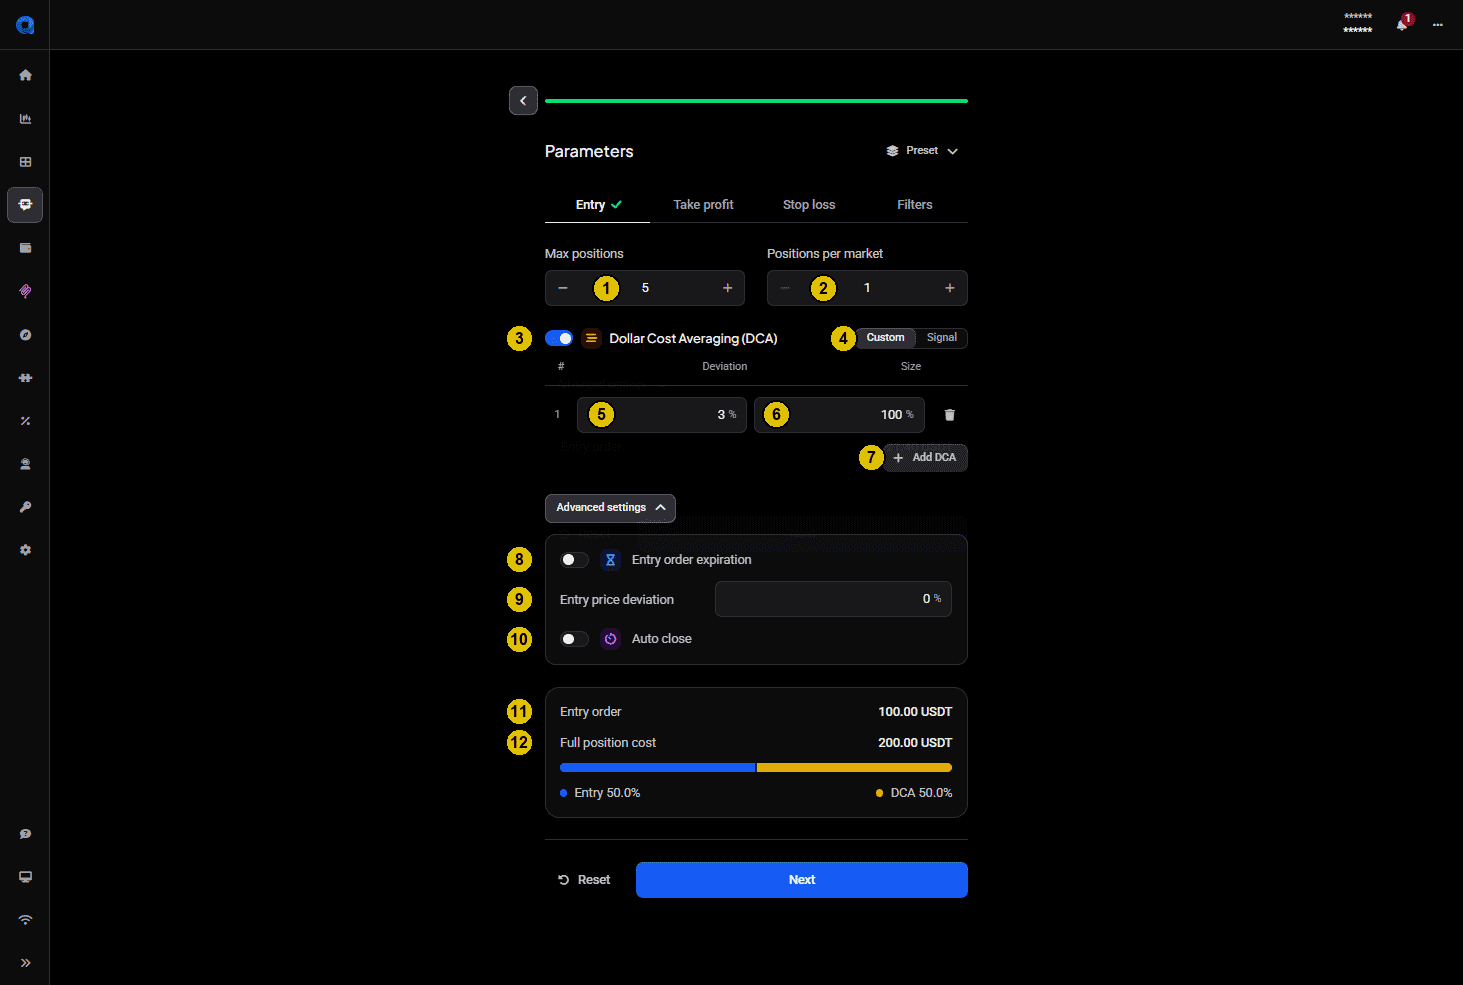
- Max positions: the total number of positions this bot may hold open at once, across every market it trades.
- Positions per market: how many of those may be open in the same market at the same time. On a futures account a Count limit per side switch appears under it, which decides whether that number is a total for the market or applies to longs and shorts separately: see Using a signal bot on a futures exchange.
- Dollar Cost Averaging (DCA): the toggle that enables extra entries below your first one.
- Custom / Signal: Custom uses the settings you enter here; Signal takes them from the incoming signal instead.
- Deviation: how far price must drop from the signal price before that DCA order is placed.
- Size: the size of that DCA order, as a percentage of the entry order.
- Add DCA: adds another DCA entry, up to a maximum of nine.
- Entry order expiration (advanced): cancels an unfilled entry order after a set time.
- Entry price deviation (advanced): adjusts the entry order price by a percentage.
- Auto close (advanced): closes the position automatically after a set duration.
- Entry order: what the first order of each position will cost.
- Full position cost: what a position costs in total once every DCA order has filled, with a bar showing how that divides between the entry and the DCA orders.
 🔍 Click the image to see a larger version
Watch those last two figures as you add DCA entries. A deep ladder commits considerably more per position than the entry order alone suggests, and Full position cost is the number that tells you how much.
Take profit tab
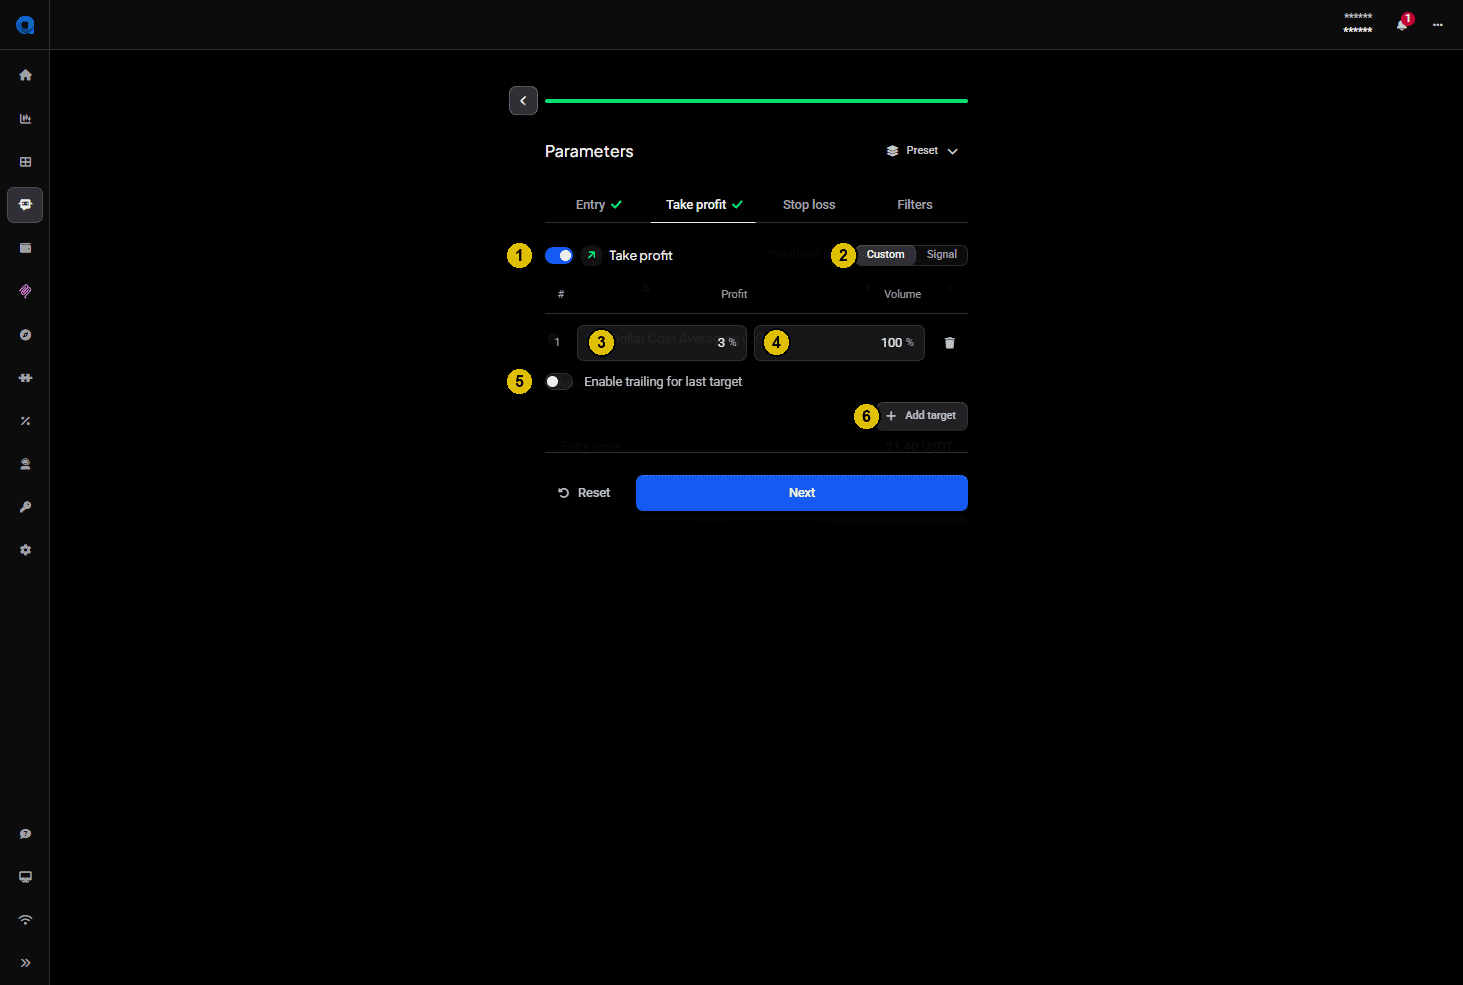
- Take profit: the toggle that enables take-profit targets.
- Custom / Signal: the same choice as on the Entry tab.
- Profit: the gain from the average entry price at which this target triggers.
- Volume: how much of the position that target closes.
- Enable trailing for last target: the final target follows price instead of closing at a fixed level.
- Add target: adds another partial take-profit level.
 🔍 Click the image to see a larger version
Stop loss tab
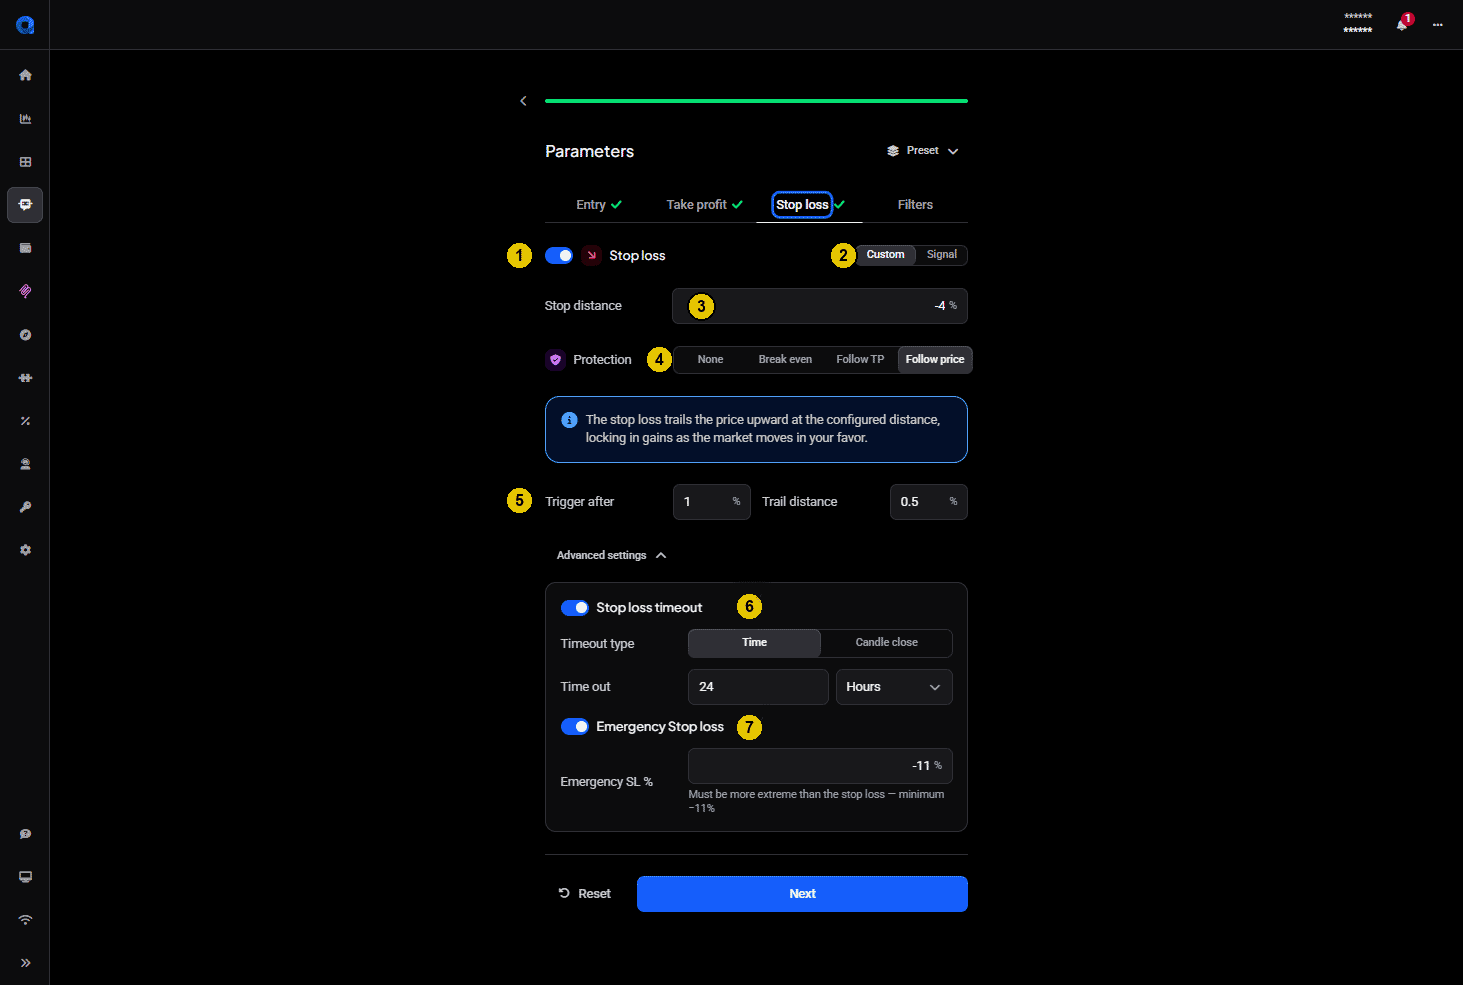
- Stop loss: the toggle that enables the stop.
- Custom / Signal: as on the other tabs.
- Stop distance: how far price must move against the position before the stop triggers.
- Protection: what the stop does as the trade progresses. None, Break even, Follow TP, or Follow price. Altrady explains the selected mode in a note underneath, so you can see what you’ve chosen without guessing.
- Trigger after and Trail distance: these appear when Protection is set to Follow price. Trigger after is how far into profit the trailing starts; Trail distance is how far behind price the stop then follows.
- Stop loss timeout (advanced): waits before acting on the stop, in case price recovers. Timeout type is either Time, with a value and a unit such as hours, or Candle close.
- Emergency Stop loss (advanced): a backup stop that overrides the timeout and closes the position immediately. Its Emergency SL % has to be more extreme than your stop loss, and the form tells you the minimum it will accept.
 🔍 Click the image to see a larger version
Filters tab
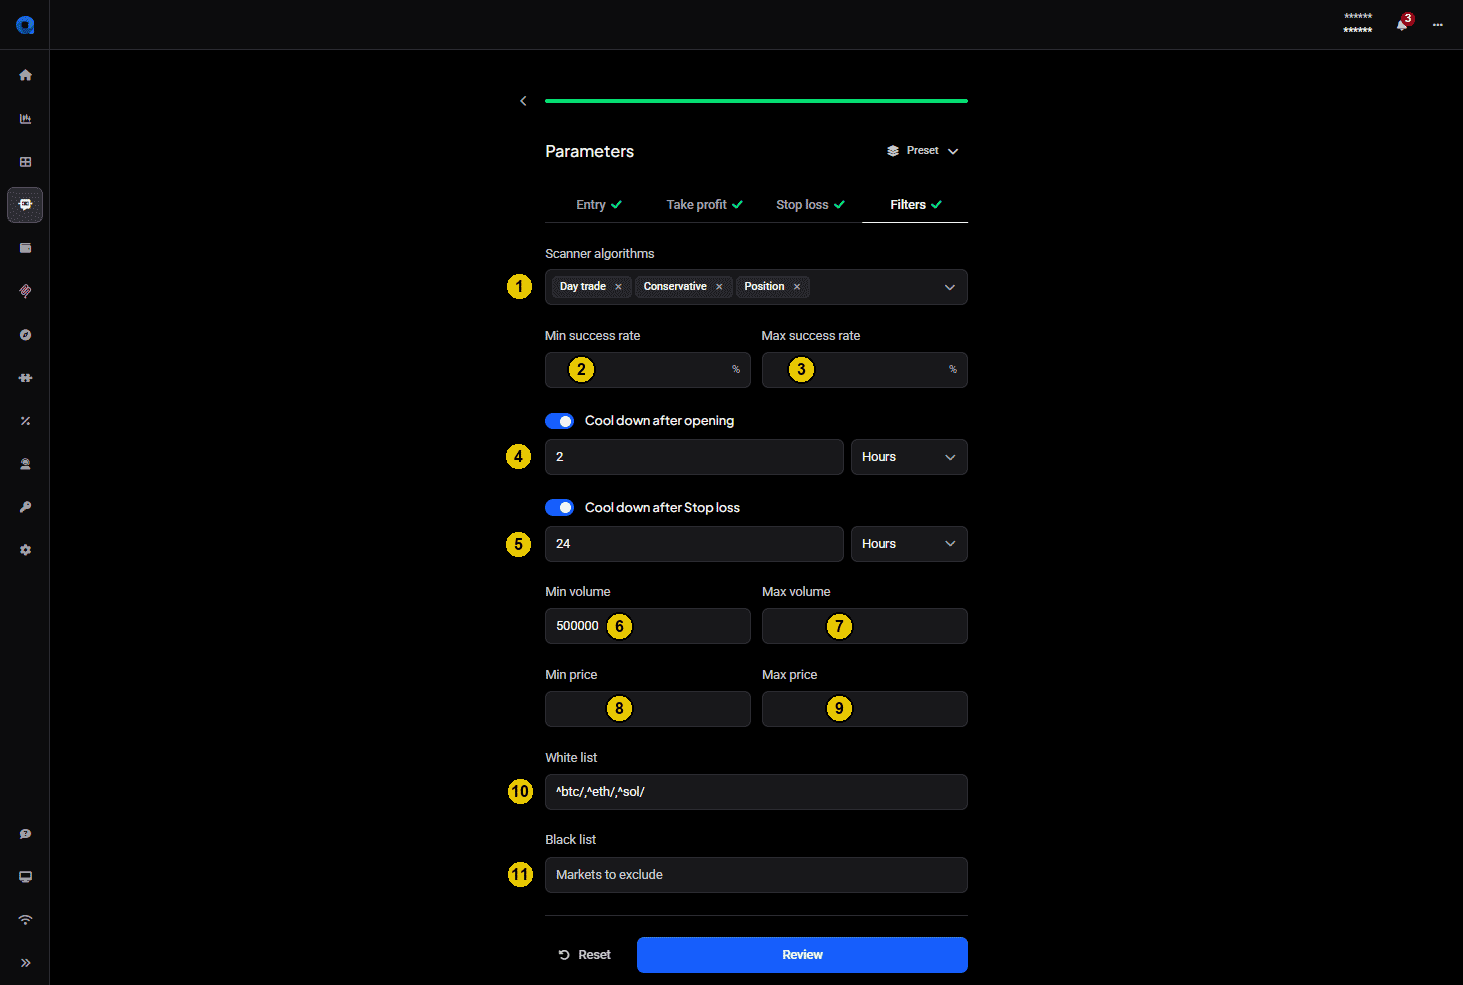
Filters decide which signals the bot acts on. The first three apply to Crypto Base Scanner signals only.
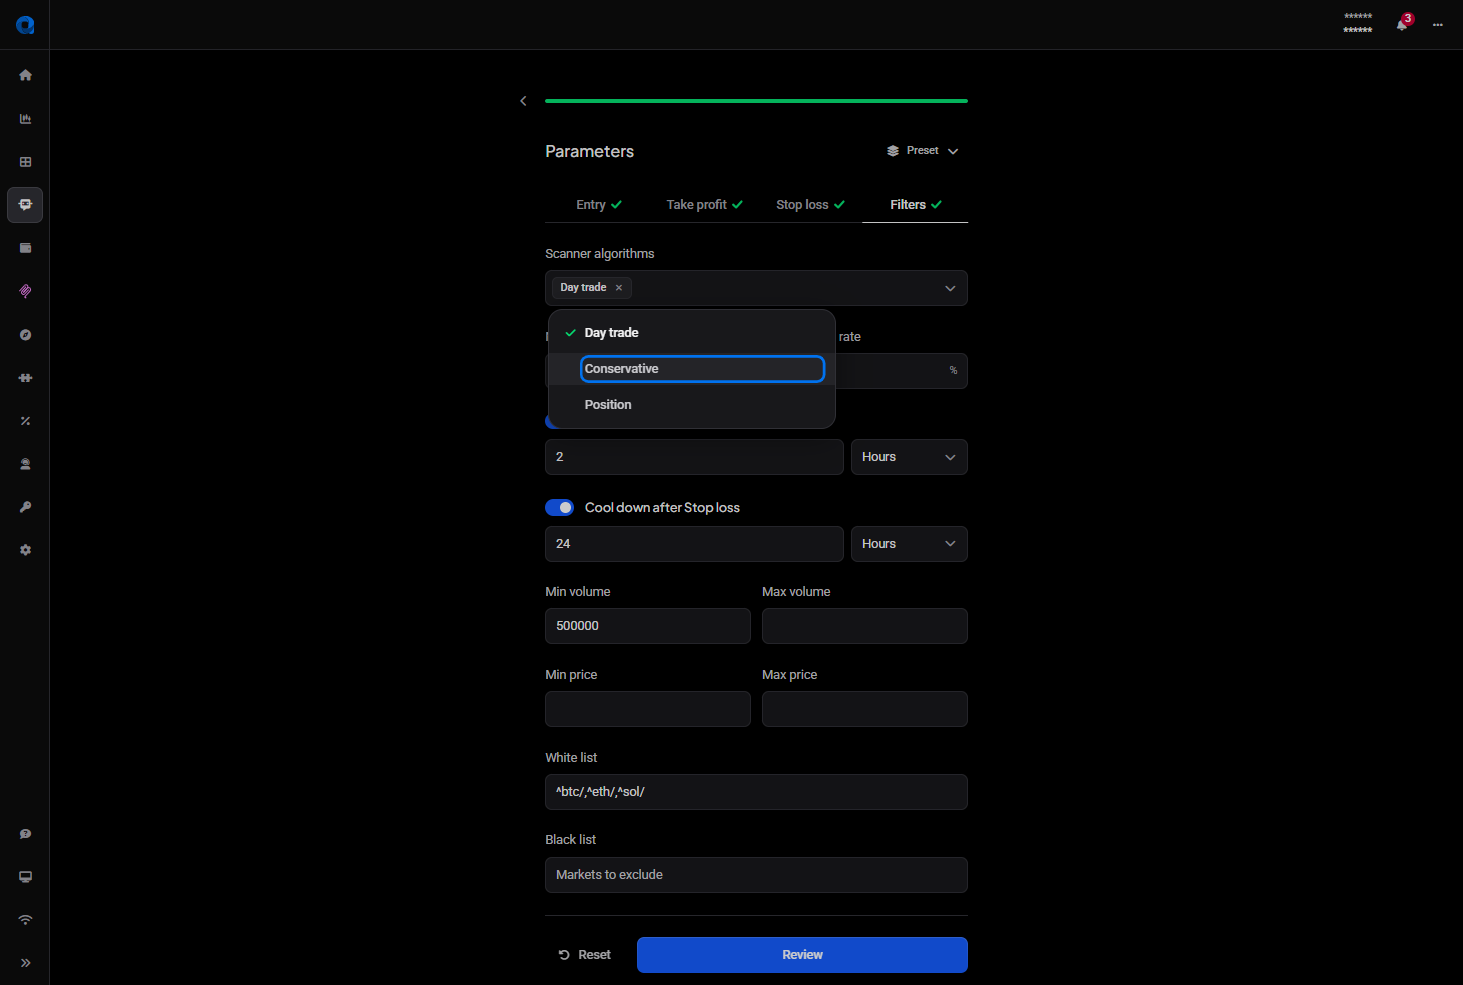
- Scanner algorithms (CBS only): choose any combination of Day trade, Conservative and Position. Each one appears as a chip in the field, and the × on a chip removes it. There’s always at least one: a new bot starts with one selected, and the last remaining chip can’t be removed.
- Min success rate (CBS only): only act on signals at or above this success rate.
- Max success rate (CBS only): only act on signals at or below this success rate.
- Cool down after opening: after the bot opens a position, it ignores new signals for the time you set here, entered as a value plus a unit.
- Cool down after Stop loss: the same idea after a stop loss fires, which stops the bot re-entering straight into a falling market.
- Min volume: ignore markets whose 24-hour volume is below this figure.
- Max volume: ignore markets whose 24-hour volume is above it.
- Min price: ignore markets whose asset price is below this figure.
- Max price: ignore markets whose asset price is above it.
- White list: only trade the markets listed here.
- Black list: never trade the markets listed here.
 🔍 Click the image to see a larger version
The algorithms field is a multi-select: open it and tick as many as you want the bot to listen to.
 🔍 Click the image to see a larger version
The two lists take patterns rather than plain market names, and they match on substrings unless you anchor them, which catches people out. For the syntax, see Signal bot whitelists and blacklists: how matching works.
Start the bot
When the configuration looks right, click Start Live Signal Bot, or Start Demo Signal Bot if you picked a demo account back in step 2. Editing a bot that’s already running shows Save changes on the same button instead.
The bot then appears in the Bots tab as active and listening for signals. Don’t worry if a new Crypto Base Scanner bot takes a few hours, or even a couple of days, to receive its first signal: that’s normal, not a sign of misconfiguration. Until then you’ll see “No open positions, waiting for next signal”, which is exactly what it says.
If you chose TradingView or Custom webhook
Those two sources need one more step, and it can only happen after the bot exists. Open the bot from the Bots dashboard to find its webhook URL and token, then use those on the sending side. See Connect TradingView Alerts to Altrady with Webhooks.
Moving from demo to live
When a demo bot has convinced you, Convert to Live copies its settings into a live one rather than making you rebuild it. A signal bot converts onto the same exchange it was demoing on, and you choose the account, quote currency and position size. See How do I convert a demo bot to a live bot?.
Plan limits
Your plan sets how many bots you can run at once, and grid bots and signal bots share that allowance. The limit counts bots active at the same time, not how many you’ve ever created, so stopping one frees a slot immediately. See How many bots can I run?, and altrady.com/pricing for current numbers.
Next steps
- Signal Bot Not Trading? Troubleshooting
- Signal bot whitelists and blacklists: how matching works
- Signal Bot Reports and Performance
Still stuck?
If your bot isn’t behaving the way you expect after checking the above, reach out via support chat. We can look at your specific bot configuration and account.