
Simple and Advanced layouts: customising your trading screen
Your trading terminal comes with two ready-made layouts, Simple and Advanced. Both use the same set of widgets and both are fully customisable, so you can start from whichever suits you, rearrange it, and save your own versions. (The Trading widget also has its own Simple and Advanced modes, a separate feature; this article is about the whole-screen layout.)
For what each individual widget shows and how to read it, see what does each widget in the trading terminal show?.
Simple: a cleaner starting point
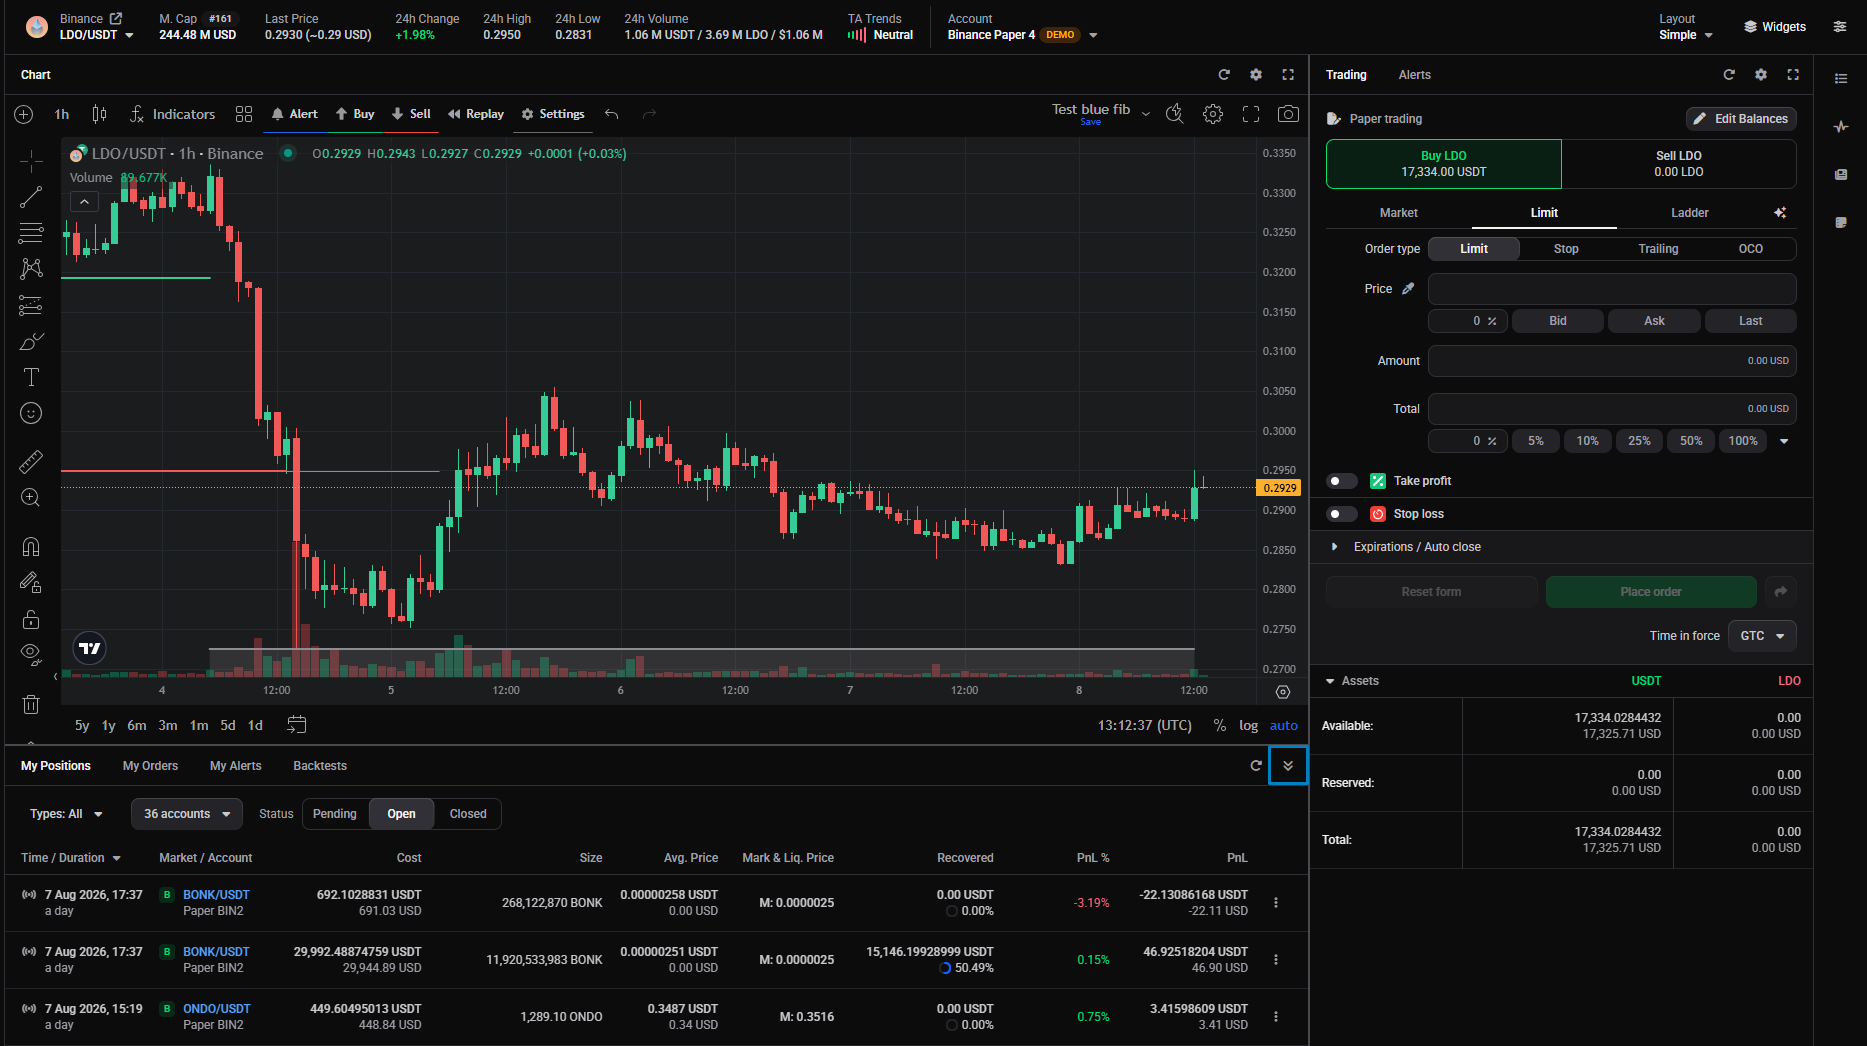
The Simple layout shows fewer widgets up front, which is easier when you’re getting started. Out of the box it shows:
- the Chart, the Trading widget, and Alerts;
- a bottom drawer under the chart (open or close it with the double-arrow) holding My Positions, My Orders, My Alerts, and Backtests.
 🔍 Click the image to see a larger version
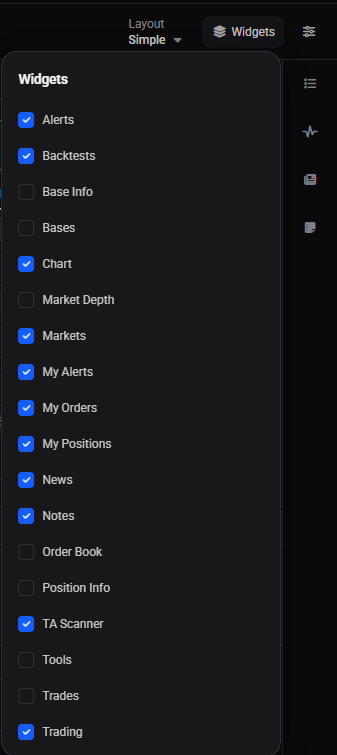
Everything else lives in one of two places: the Widgets dropdown, or the right sidebar. Click a widget in the right sidebar to open it in the right drawer, which shows one widget at a time and is either open or closed (close it using the double-arrow). Widgets that aren’t on screen and aren’t in the right sidebar show up disabled in the Widgets dropdown, ready to switch on.
🔍 Click the image to see a larger version
Everything else lives in one of two places: the Widgets dropdown, or the right sidebar. Click a widget in the right sidebar to open it in the right drawer, which shows one widget at a time and is either open or closed (close it using the double-arrow). Widgets that aren’t on screen and aren’t in the right sidebar show up disabled in the Widgets dropdown, ready to switch on.
See below for how to add and move widgets.
 🔍 Click the image to see a larger version
## Advanced: more on screen at once
🔍 Click the image to see a larger version
## Advanced: more on screen at once
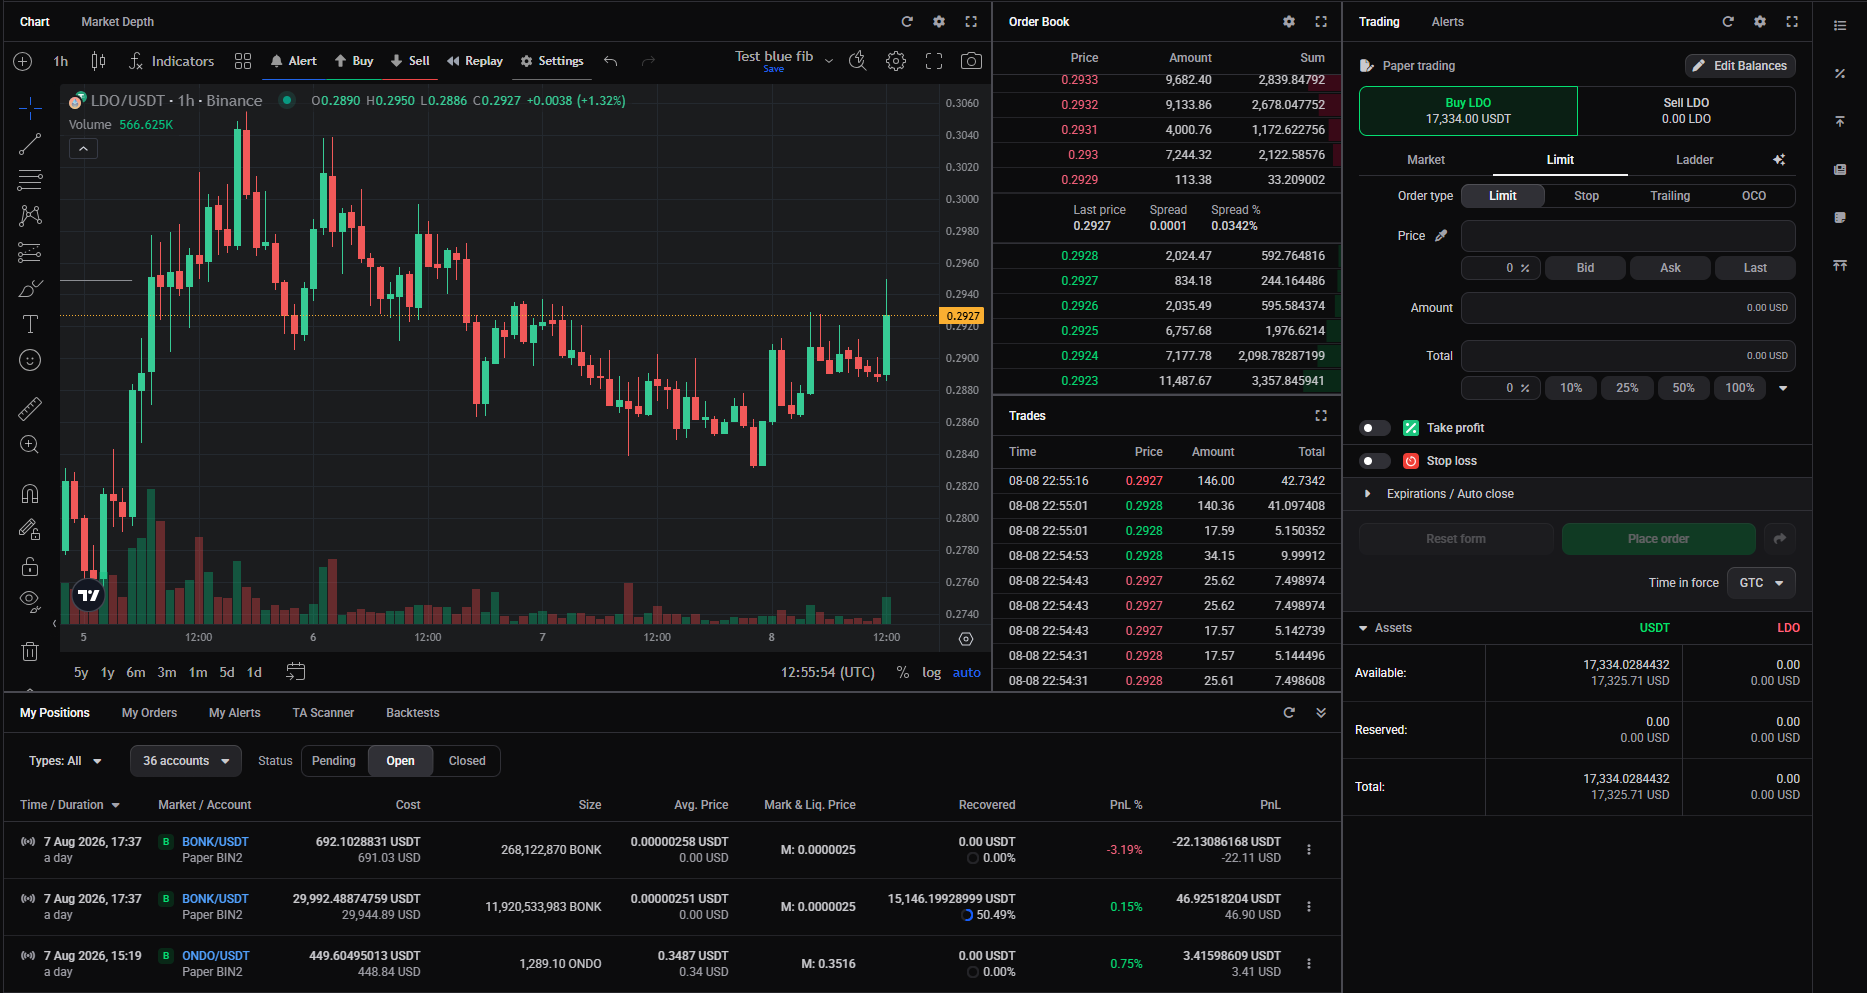
The Advanced layout is aimed at intermediate and experienced traders and feels more like an exchange screen. Compared with Simple, it adds three things:
- a widget group to the right of the chart with the Order Book and Trades (trade history);
- the TA Scanner already switched on in the bottom drawer.
Its right sidebar also carries a few more widgets than Simple’s. As in Simple, click one to open it in the right drawer, or drag it onto a group to add it, and you can build new widget groups by dragging (below).
 🔍 Click the image to see a larger version
## Add or remove a widget
🔍 Click the image to see a larger version
## Add or remove a widget
- Click Widgets in the top bar to open the checklist of every widget.
- To add a widget that’s disabled, first click inside the widget group you want it to join (for example, click in the Trading widget), then tick the widget in the list. It’s added to that group, at the end.
- To remove a widget, untick it. The dropdown stays open, so you can toggle several at once.
 🔍 Click the image to see a larger version
## Rearrange and move widgets
🔍 Click the image to see a larger version
## Rearrange and move widgets
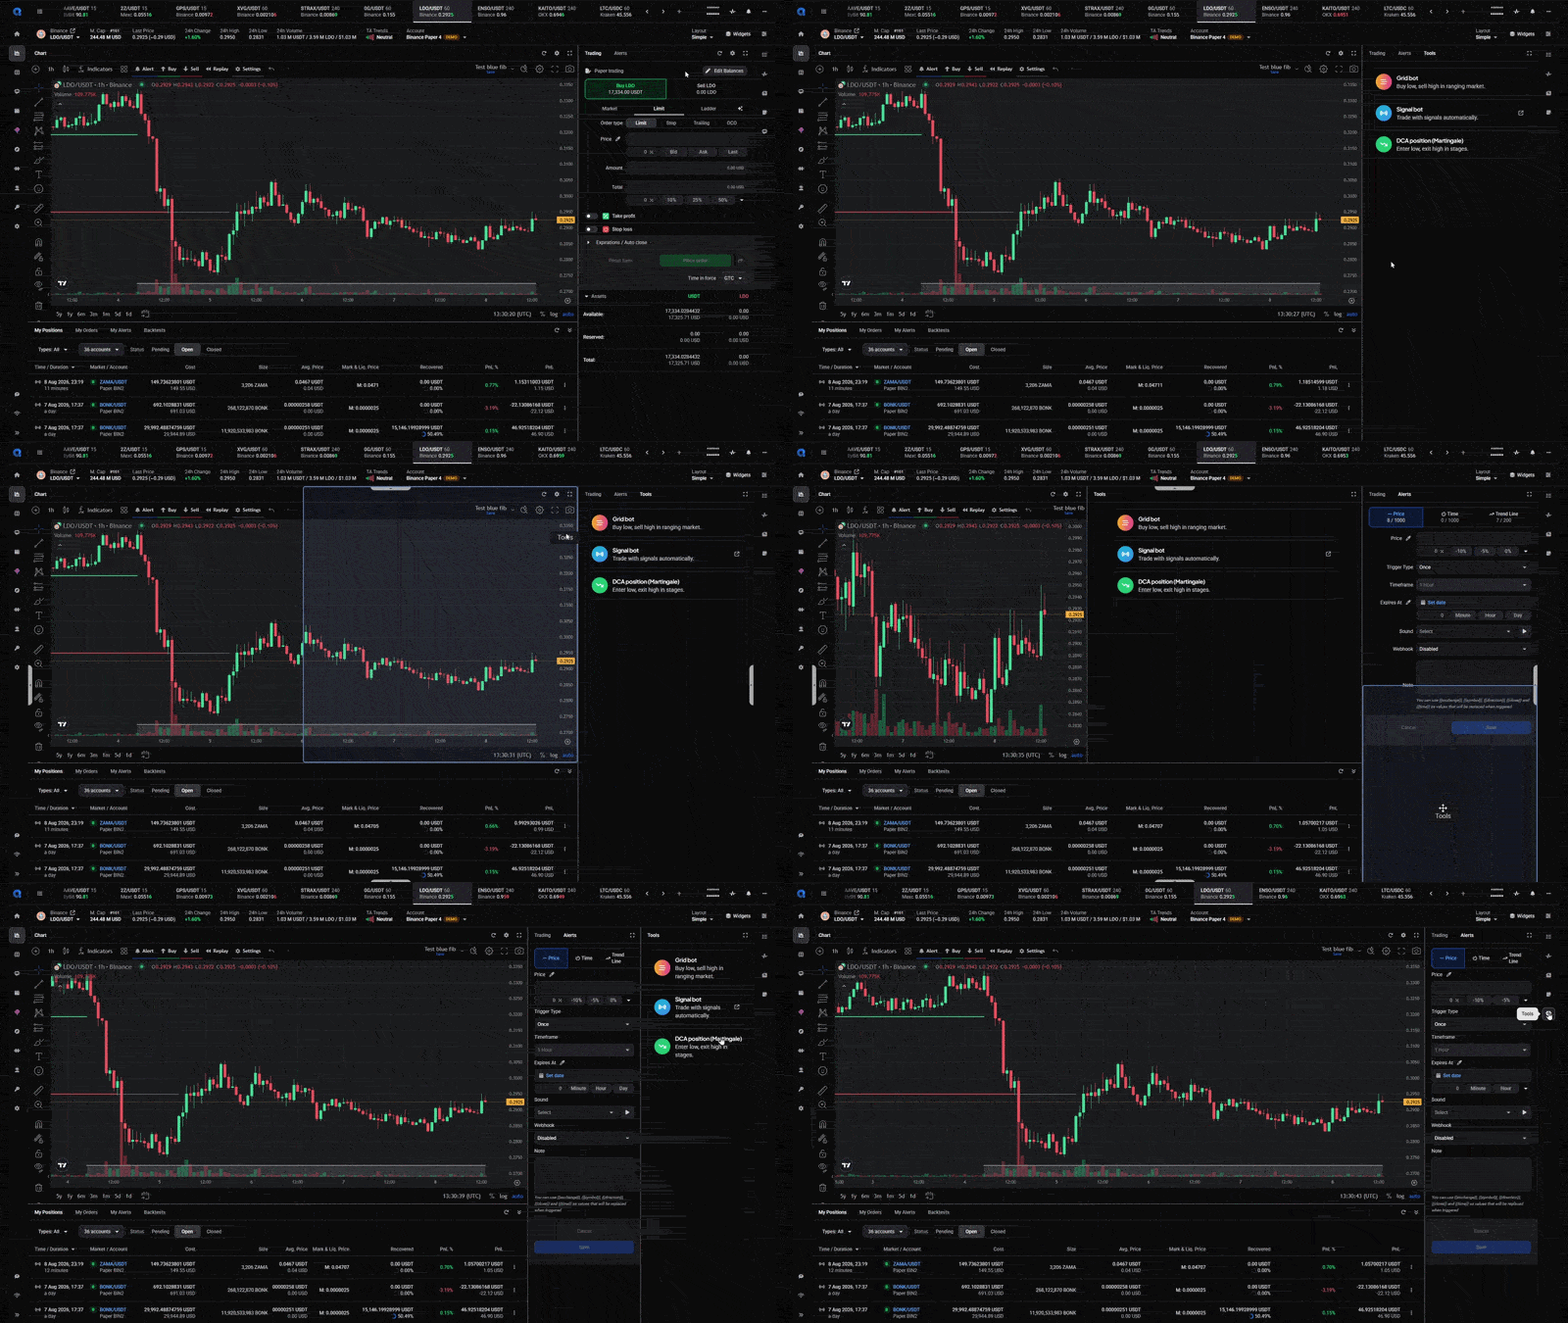
Drag-and-drop to arrange your widgets and widget groups:
- Reorder within a group: drag a widget’s tab left or right.
- Move a widget to another group, or start a new group: drag it to a new spot on the screen. A blue outline previews where it will land: if the outline covers an existing group, the widget joins that group; if it doesn’t, a new widget group is created there. For example, drop the Tools widget on the bottom half or right side of the Trading widget to make a new group there. See gif above.
- Where new groups can go: above, below, left, or right of the Trading widget, and above, below, left, or right of the Chart widget. The one exception is the My Positions drawer, which can’t be split.
- Send a widget to the right sidebar: drag it there; from the sidebar, selecting it opens it in the right drawer.
Saving your changes
Layout changes aren’t kept automatically, you save them yourself. (See Layout Settings below for how to turn on Auto Save Changes.)
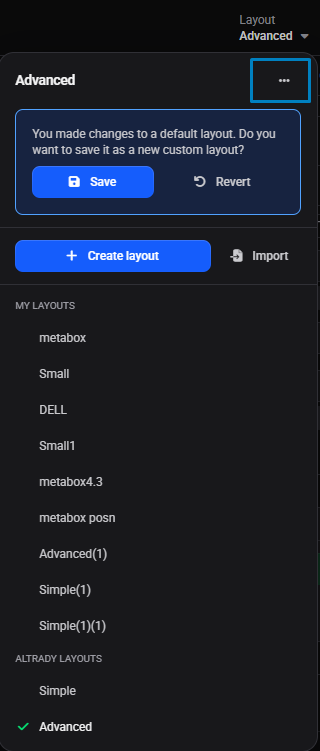
- Open the Layout dropdown at the top. If you’ve made changes, you’ll see Save and Revert.
- Save stores your version. Because Simple and Advanced are shared defaults, saving asks you to give your version a new name, and it’s added under MY LAYOUTS; the original Simple and Advanced stay as they were.
- Revert discards the changes and puts the layout back to its last saved state.
 🔍 Click the image to see a larger version
To avoid saving each time, open Layout Settings (below) and turn on Auto Save Changes.
🔍 Click the image to see a larger version
To avoid saving each time, open Layout Settings (below) and turn on Auto Save Changes.
Managing your layouts
The Layout dropdown lists ALTRADY LAYOUTS (the built-in Simple and Advanced) and MY LAYOUTS (your saved ones). See image above. From here you can also + Create layout or Import a layout.
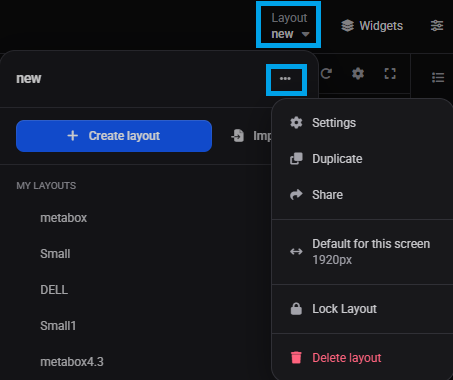
Each layout has a three-dot menu with more options, and what you see depends on whether there are unsaved changes:
- with unsaved changes: Duplicate, Default for this screen, and Lock Layout;
- on a saved custom layout: Settings, Duplicate, Share (export), Default for this screen, Lock Layout, and Delete layout.
What each does:
- Duplicate makes an editable copy, a good way to start from a built-in layout.
- Default for this screen makes that layout load automatically at your current window width (shown next to the option, e.g. 1920px), so a laptop and a wide monitor can each have their own default.
- Lock Layout stops accidental moves and resizes until you unlock it.
- Delete layout removes a custom layout; the built-in Simple and Advanced can’t be deleted.
Layout Settings
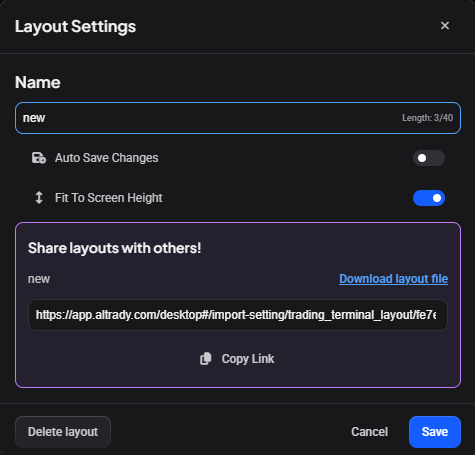
Open Settings on a custom layout to:
- rename it;
- turn on Auto Save Changes so edits are kept without the prompt;
- turn on Fit To Screen Height so the layout never grows taller than your screen (with it off, a layout can end up longer than the window);
- Share it: Copy Link, or Download layout file to back it up or send to someone. (Bring a shared layout in with Import on the dropdown.)
 🔍 Click the image to see a larger version
 🔍 Click the image to see a larger version
> You can keep up to 10 layouts. Once you reach the limit, new layouts and changes won’t save, so delete one you don’t use to free a slot.
🔍 Click the image to see a larger version
> You can keep up to 10 layouts. Once you reach the limit, new layouts and changes won’t save, so delete one you don’t use to free a slot.
Still stuck?
If a layout won’t save (check you’re under the 10-layout limit), a widget won’t move where you want, or a default isn’t switching as expected, reach out through support chat with which layout and widget you’re working in.